GARMIN'S NEW PRO 550 DOG E-COLLARS
UPDATE 2016: After almost two years of using the Pro 550 for all of my training, I continue to give this product high marks. I have had no problems with operation or performance. On a few occasion when I used the e-collar extensively all day for several days and left the unit in the truck over-night in sub-freezing conditions I had premature low batteries. I did lose one receiver when I failed to loop the end of the collar completely through the retainer loop. I found this unit3 weeks later and it came to life after charging. It continues to work today. There are several styles of strap designs by Garmin and I have a few replacements from another manufacturer. I use the Garmin Pro Sport for duck hunting but the Pro 550 is my mainstay training e-collar. It has the features I want including variable intensity with 3 levels, momentary and continuous, 3 dog toggle plus the recall tone, bark collar option and night light!
Note: Photos for this article are at the end.
Perhaps you have been observing the changes occurring since Tri-Tronics became a part of Garmin. Tri-Tronics e-collars have been the top choice of many successful Professional and Amateur retriever trainers. Although not everybody embraced them, a large number were committed to the Tri-Tronics e-collars and the tubular or cylinder shaped transmitters. The flagship model was the Pro 500 which offered 6 levels of intensity, both momentary and continuous stimulation, and control of three different e-collars from one transmitter. Other popular models were the 100, 200 and Flyway, among others.
As the industry began to embrace other styles, such as the smaller rectangular handheld devices, there was concern by many that the Pro 500 and familiar features would disappear. We now have the answer – it hasn’t and it has come back better than ever.
I have been using the new Pro 550 almost daily now for about three months. I think it is a winner and in this review I will describe it in depth.
The Garmin Pro 550 Owner’s Manual refers to it as the Pro 550 system, which consists of a dog collar device and a handheld device (plus the collar strap and battery chargers). I still think of them as the receiver and the transmitter. The transmitter is loaded with features but if you choose you can ignore most. It has the familiar intensity dial on the transmitter but there are now 7 levels of intensity. I’m not sure why we needed an even higher intensity level as a high 6 was already significant to retrievers. There is an additional setting – “V”; this setting is for a vibration mode. This mode could be used to signal a dog for various conditioned responses or as an antecedent to either an aversive like a nick or a reward like praise or a cookie. Obviously there was some feedback back from users to add this feature even though I don’t know of retriever trainers that use it yet. In my experience, with 4 different dogs, I did not detect any significant difference in level 1-6 in the Pro 550 versus the older 500 intensity levels.
For each level you have low, medium and high levels, controlled with the usual two main buttons of the 500 model (although Garmin now calls these “keys”!) The buttons are used the same, that is, lower is low level, upper is middle and both together is high level. In addition, you have a toggle controlling momentary or continuous mode.
Similar to the 500, you can control three e-collars from the one transmitter. A toggle switches from black to blue or red. Both toggles are shorter than in the older 500. While a short toggle isn't a problem for me for the two types of stimulation (because all the way up is momentary and all the way down is continuous and thus easy to select blindly), I found the short toggles a problem for the 3 different dog modes. It is now much harder to blindly switch from one dog to another because it is so easy to by-pass the middle position with the little toggles. I’ve gotten better at it but I would prefer the longer toggle with more positive détentes. When you put the toggle in the accessory position, you can turn a light on the receiver on or off with top or bottom buttons. This light is similar to the add-on option on the older models. It is a white light but remarkably bright and valuable when airing at night. The accessory button can also be used to operate optional accessories such as a beeper device (as used by some pointer folks). There is also a green “key” (button) which is the tone option. This can be used for a good dog tone or, as I do, as a recall signal. Whenever any key is pushed a small green light illuminates on the top of the transmitter.
The housing of the transmitter is similar in size to the old 500. It has a more sculptured exterior with 8 visible screws holding the rubberized portion to the hard plastic portion. It seems the old problem of rubber separation is far less likely. There is a slot at the bottom for those that would want to add a lanyard. I much prefer the typical back pocket usage as opposed to the dangling from the neck use. That is one of my main reasons for disliking the smaller rectangular transmitter models, along with a greater need to look at the unit to change settings. The antennae is only about 1.5 inches long and is thick and heavy duty. I can’t imagine breaking it although some have told me they did break the old ones by sitting on them!
The charging port for the transmitter is under a rubber flap on the back. It is a mini-USB port.
The unit is labelled Garmin with Tri-Tronics just below it. The back of the unit also has the classic TT logo. I found out from my contact at Tri-Tronics that the unit was designed by Tri-Tronics engineers using Tri-Tronics know-how. Unlike earlier models, this unit is made in Taiwan although it is assembled in the USA.
The receiver has also undergone much redesign and now has many features compacted into it. It is smaller than earlier versions. It has 4 strap retainers, rather than two like the old. I had broken retainer straps on earlier versions but this seems more unlikely now as they are definitely more heavy duty.
The strap itself has been changed from a 1” width to a ¾” width. This is getting all sorts of discussion by users, some of who do not like the narrower straps. Actually, the narrower strap is becoming the industry standard and you can get such straps from several suppliers. Given the smaller receiver, I actually like the narrower straps better. I do not see it as causing more strain on the dogs. I find it easy to tighten accurately (there are many holes, one each half inch. What has also been controversial is the buckling. Indeed you will see photos of several types of different buckles, perhaps at least four. I personally have three different types of buckles. See the photo for comparisons. Some are complaining about the lack of a true D buckle. I am not among those. I don’t like to attach a tab or a lead to an e-collar because of the prongs. On tie-outs, that is how I broke off the strap retainer tabs. Thus, I use another collar or loop the chain with a snap. If walking with a lead, I use the lead or a choke chain and never hook up to a D ring. In fact, I dislike the inconvenience of some older straps that required you to feed the strap through a D ring first. However, if you insist on true D rings, you can buy after-market collar straps. I will admit that one version of the strap, the simplest, does have a drawback. Because the strap is narrow, it does twist easily when only fed through the buckle and not into the retainer as well. I have had this style fall off the dog when I did not feed it through. Incidentally, the straps come quite long. The first thing I do is cut a few inches off but keep them long enough to fit the biggest Labrador. If you have a Rottie or Newfie, better not do this! I also replace the short prongs with the long as soon as I get a new collar. They provide much superior positive contact on the dog’s neck.
There are some great features on the receiver. First is the turn on button. It is easy to press: when pressed once, a green light indicates “on”. Press it again and a red light indicates “off”. Hold it down until a blue light comes on and you will go into bark limiter mode. Yes, it has a built in anti-bark feature.
Historically, I have not used bark collars very much. In the past, I have disliked a collar nicking my dogs without my control. However, in the interest of all of you, I tried it on my dogs for this review. The way this unit works is that it starts off with low intensity upon detecting a bark. Subsequent barks cause a higher stimulation. I don’t know the details of how high it goes and how quickly. I do know that when you turn off the bark limiter option the collar will tell you how many times it was used in response to barking. It will flash one green light for each bark and one red light for each 10 barks. Thus 3 greens and 1 red indicates the collar stimulated 13 times. My dogs are not much in the way of barkers except for intruders on the property or others close to the truck. They will, however, whine when I take other dogs out of the kennel or truck. Well, lo and behold, this unit was great in controlling that including when I drove away with one dog and left another behind. I am now a fan of the anti-whine limiter. The nicks are so low I have never had my dogs yip in response and they almost always appear to shut up in 2-5 nicks. Incidentally, you cannot have the e-collar in bark mode and controlled stimulation mode at the same time. This makes sense to me since when you want to control the stimulation, as in training, you would not want to have the collar stimulate on its own.
As mentioned above, there are two very bright lights built into the receiver. They are turned on by first putting the toggle to A for accessory. The upper key turns them on and the lower key turns them off. The collar must first be turned on but not in bark limiter mode.
Charging of the receiver is done by attaching a clip on the charger to the unit. It’s a bit finicky until you get used to it. The receiver “tells” you the status of its batteries. When flashing green every few seconds, the unit is on and good to go. When the light changes to a pale whitish-yellow colour, the battery should be charged soon. I have allowed my units to get to this stage and then was able to complete a training session of several hours. When the light turns red, it indicates that the battery is very low and must be charged. Flashing red means the collar features will not work. On one occasion I used my collar in the morning (green flashing) and then forgot to turn it off after training. Late that night after about 12 hours, the unit was completely dead and wouldn’t turn on until after charging. Units charge in about 2 hours and Garmin claims about 60 hours in typical usage. Overall, I have the impression that batteries need charging more frequently than the older G3 models. The User Guide contains complete instructions for user replacement of batteries in both the receiver and transmitter but I have not tried that yet.
Time will tell just how durable these units will be. They appear more robust and are designed more strongly than earlier versions. I have faith in the electronics having been Tri-Tronics engineer designed. Incidentally, there are industry standards around what is “water proof” and what is “water resistant” and for how long and at what depth. Consequently, we read the following for the Transmitter – water rating of IEC 60529 IPX7, which means it can withstand being under water at a depth of 1 meter for 30 minutes. For the receivers, we note 1 ATM which means the unit withstands water pressure equivalent to a depth of 10 meters. Let’s just call them waterproof! Operating temperatures are -4 to 140°f (-20 to 40°c).
Units are packaged in the chic new black boxes that many new camera and new Apple products are now using. All in all, pretty classy marketing appearance and packaging.
As I said at the beginning, I think this is a winner. You will be pleasantly surprised to learn that the system is less expensive than earlier models. A single transmitter/receiver combo is only $400 USD and each additional receiver is $150 USD. They are now in stock with most gun dog supply companies. In Canada, you can order from Zinger Winger, as well as Dakota Creek Retrievers.
For more information go to: www.garmin.com/outdoor or www.garmin.com/learningcenter.
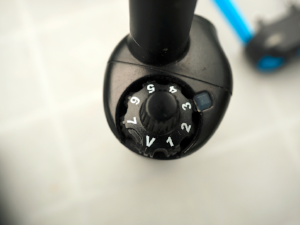
Photo 1: The Dial: The intensity dial has 7 levels now plus a V for vibration mode.
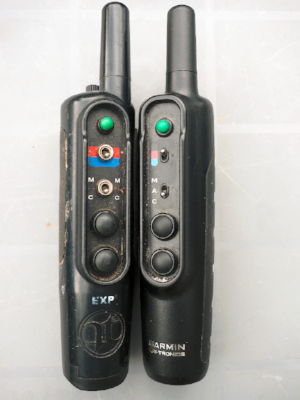
Photo 2: Old/ New Handhelds: Size difference of the Pro 500 (left) and 550 transmitters is minimal but the new model appears more durable.
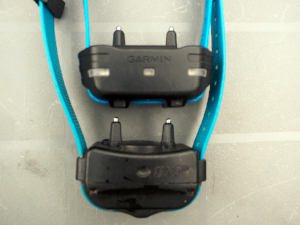
Photo 3: Old/ New Receivers: Despite all the additional features, the new 550 receiver is smaller (top) than the older model. The old EXP receivers are not compatible with the new transmitters!
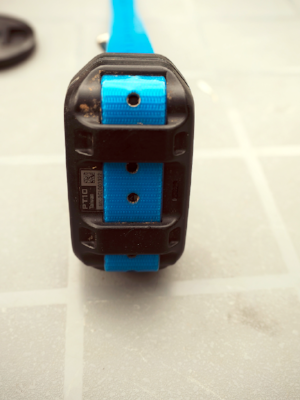
Photo 4: Four Retainers: The new receiver has 4 secure retaining tabs.
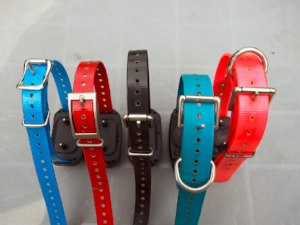
Photo 5:Collar straps: Three different Pro 550 system 3/4" straps. The two on the left are more secure. The two straps on the right are 1", from the old Pro 500 system. They have D-rings. The one on the right requires feeding through 3 loops . . . cumbersome

Watch Bill Hillmann's review here
Read about DVD contents here
Order now from Ybs Media here

Read Training Retrievers Alone
DVD Review here
Order from YBS media here
We still have a selection of the valuable Back Issues of Retrievers ONLINE
To find out which issues are still available and costs click here
Currently we have a website launch sale and discounts available.
If you have never seen an issue of Retrievers ONLINE, you can view a complete issue here.


Add A Comment
Comment
Allowed HTML: <b>, <i>, <u>
Comments